Friday, December 24, 2021

Cue The Lights

My very last christmas card for this year which is for The Doc.  I saw this image from Pink Gem Designs and just knew I had to get it. The only time we get dressed up now is to go either to the Dr's, Dentist or Opticians so thought this digi  would be perfect to colour up in both our favourite colours. I also knew that I wanted to have  little lights on the card and found  a Tutorial on You Tube by Maximum Crafts. Maxine's instructions were very easy to follow.

This is the card in daylight.


Coloured using my Graph'it pens and silver/gold gel pens, then given a liberal dusting of Pearlescent chalk for  a subtle sparkle. The die cut frame by  Card Deco is called ' Holly Round' and the  sentiment by Tonic Studio's Merry Christmas 1404e.  The picture below is taken with the lights  switched on the card but the glare from the Gold mirror card  was not allowing me to get a good photo though it does show The Doc's fancy scarf and bobble hat up nicely !

Taken with the house lights off  and the lights  (which are hidden behind the front panel of the easel card ) switched on. The Doc loved his card. 


Wishing You All
Happy Christmas
and a 
Healthy Year for 2022.

Stay safe and jabbed up to the hilt!!
 

Wednesday, December 15, 2021

The Boys.

Both of our Grandsons have their Birthdays in December. One at the beginning and one at the end and these are this years cards for them. How did they get to be 13 yrs and 14yrs so soon!

Card for  Grandson No 2.

Image is by Mo's Digital Paper called ' Noah' coloured with my Graph'it pens and given a light dusting afterwards with Pearlescent chalk.  The design paper is called Stars and Stripes from the Nancy Watt collection  a freebie from Making cards Magazine.  I found an embossing folder in my stash,  and as I am making it my mission to actually use my folders I decorated the handmade envelope with it. Called 'Argle' by Sizzix. I  coloured in using a selection of distress inks to match the design paper.

Card for  Grandson No 1.

I don't have a name/who by for this paper other than it was a freebie from a  magazine a long time ago. The image is Aiden by Mo's digital Pencil.  I coloured the image first and then found the paper in my stash so a stroke of luck that it goes so well. Used my graph'it pens as before and made into an easel card. The name is using an alphabet set by Woodware called 'Oriental Style' . The sentiment is a die cut by Creative Expressions and layered up with two layers of plain card and then the top layer cut from the design paper.  I used every bit of the A4 paper up and the last little scrap that was left I put on the envelope which you can see behind the card below. I am not allowed to say he has red hair but he has as does his sister.!

I had my flu jab yesterday morning  which floored me for 24hrs but I feel ok now. The nurse wanted to give me a Tetanus and a Pneumonia jab at the same time but that was going a tad too far for me so I have those to look forward to in the New Year. 

Stay safe and well
for Christmas.

Saturday, December 11, 2021

On Point.

The very last of this years Christmas cards. Specials for my grandchildren.  All safely in the post for them.
I recently saw this card shape on a blogging friend's  (Carol 'Crafty-Stamper')  page and thought what a perfect design it would make for the stamp I had in mind to use. I actually bought the stamp this time last year and have kept it to use now as I already had their cards made for 2020.  Found a great tutorial for it on You Tube  from Maximum. I have called the card 'On Point'  as it reminds  me of  a row of  ballerinas up on point but both Carol and Maxine are calling it a Diamond Point shaped card. 

Card 1

The yellow star paper is from Making Cards magazine Nov 2016 and the snowflakes design is by Alison Butler from Crafts Beautiful magazine. The stamp is by Clarity and comes with an assortment of stamped strips to make up your own  design on the jumper . The Large letter is by my Daughter  AIFaDoodles - CWSD331 from Whimsy Stamps. Fluff now has a whole range of Fadoodle stamps out and a new one coming in the New Year.  (Mum preening her feathers here!) Coloured using  Graph'it pens and then a liberal dusting of Pearlescent chalks for a subtle sparkle. 

Card 2

I am not sure where I got the reindeer paper from but the tartan is by Paper Addicts 'Lost Forest'.
Again coloured using my Graph'it pens. You can see a little clearer on this one the doodles on the letter D. Each letter of the Alphabet in the set has Fluff's trade mark dooling on it. 

Card 3 

The snowflake pink paper  is by 'Humphreys Corner' Christmas collection and the star design by Salley Monet. 

My fingers do not like the cold weather and have not been crafting or blogging  so missed out  again for showing my cards in the Christmas Card group that I am in. Fortunately the theme is anything goes and is the last one for this year.
I am so pleased that I had managed to get the majority of  my cards made in the summer months so only had the envelopes to make and decorate the past few weeks. Thankfully all in the post now and I even beat the deadlines for abroad. 

Hope everyone has a lovely  time this Christmas and all those due their boosters can get them done. 


Stay Safe and well
Hugs 

Sunday, November 21, 2021

Deer Herd.

I missed the last show and tell for the Christmas Card Club that I am in but  have managed to make one card for this week. I didn't use the set theme and went with the fall back of anything goes. I have been watching quite a lot of old 'Clarity' You Tube videos  and as I have quite a few of their masks decided to make a little scene up using some of them. I vagally followed  where Barbara led  and this is the result. 


 I used s Moon mask, Pine forest mask and deer from the Riverside extras masks and various coloured ink pads. This card is for a friend who for the entire time we worked together only ever wore the colour black. Even when we meet up for a coffee  she  insists that it is the only colour that suits her so this card will make her smile as I am still trying to instill a bit of colour into her life. 

Well that was the week that was.  I had my booster jab which ended up being the Pfizer vaccine (even though I had been told not to have it the first time round due to all  the allergies I have) and really thought by the end of day one that I had gotten away with just feeling very cold and tired. It hit me day 2 and 3  with a wallop and I spent my time huddled under blankets on the settee. Still if that is a taster of what the full blown virus feels like if you catch it then I'm for the vaccine each and every time!!

Stay safe and well
Hugs
 

Wednesday, November 10, 2021

Windmills of my mind.

So here we are very nearly at the end of the year and before the Butterflies go into their annual  hibernation (and that delightful/ dreadful Elf puts in his usual appearance) the last challenge is up and running over on the Butterfly Blog. 

Here is the latest  butterfly wheel to be used. 


Your 6  elements are:
Windmill Card/Words / Wine/Wisteria/Wheat
+your Butterfly.

 N.b.  Wine  = Dark Red.
Wisteria = Light Purple.
Wheat  = Light Beige.

I have made two very different versions for this card shape and here are my inspiration cards for you to see. 
The instructions/tutorial are over on the Butterfly Blog as per usual and can be found under the card shapes tab here. 

Version I

I have used Windmill/Words/Wine/Wheat/Butterfly.

Papers used are from The Works and the sentiment is by Woodware from Their Boxed Greetings set. (The stamp is meant to have the dots and splodges in the design and not me having butterfly fingers!!) The butterflies were punched using my small SU butterfly punch and the pearls from my stash. 


Version II

I have used all six elements :  Windmill/Words/Wine/Wisteria/Wheat/Butterfly.

As you can see,though it is a windmill shape it is a very different way of piecing together. 

I have again used papers from The Works and the small butterfly design paper was a magazine freebie. The wine and base cardstock from my stash. The circle in the centre of the windmill was die cut from a Handy little die  by Jane Gill  called Bubble Craft Die from Woodware. It die cuts 3 different size circles and is meant to co-ordinate with all Bubble series clear stamps but as you can see here is also very handy for windmills and flower centres!! Not very dear to buy either. Just saying. The sentiment is from a set of die cut greeting from Papermania. Once I had adhered the windmill in place on the purple paper background I embossed it along with the Base card made from wheat coloured cardstock using an embossing folder from Anna Griffin called Circular grid. 
I hope you will have time to come along and play. Both versions are very quick and simple to put together. The challenge is running for the 3 weeks as usual so will finish
on 30th November. 
I have my booster vaccine booked for this Friday and so not looking forward to it. 


Hugs and stay safe.
 

Monday, November 01, 2021

Gnoming!

Should have posted last week but Hey Ho I am here now with the latest selection of cards for the Christmas Card Club. The theme was Santa's little helpers. I have just purchased this trio of Gnomes from Woodware called 'Gnome Friends'  and  The Penny Black  stamp ' Holly Jolly  Critters' and thought both fitted the bill.
I have several / well quite a few Christmas Embossing Folders which I never remember to use till I have finished a card but this time was determined to use at least one . This is by Crafts -Too called Merry Christmas. I had a ready made red blank card with a matching envelope in my stash so popped them both through my die cut machine with the embossing folder. Really pleased how they came out, especially the envelope. Simple pleasures!! The sentiment is by Jane Nestorenko. Gnomes have been coloured using my Graph'it pens and die cut out using a Tattered Lace  rounded corner  rectangle die. 
For the card above  I used up scraps of christmas design papers . The 2 papers to the left (behind the string and image) are a Paper Crafts Special 2017 and a Nitwits Snow Flake Red from their Believe too pack. The others I have no names for but they were freebies from a magazine.  Gnomes coloured again with my pens and edged round with a silver gel pen. Silver spots are stickers from my stash and much flatter than gems for posting I find. 
Whilst mice and hedgies are not especially known for helping out Santa at christmas these little characters are helping out with the decorations so in my book they pass muster.  The sentiment comes with the stamp and on both cards I have used a corner punch . the papers above are a snippet of small tartan by Making Cards from their christmas edition 2015 and the larger tartan  is by Trim Craft. Both magazine freebies. White cord and ribbon from my stash and are the from tags on clothes and the ribbons they attach to the inside of jumpers and dresses that I have never found useful and tend to show if not tucked in when wearing the said item. Much easier to cut out and use! Images coloured using the same pens as above  and the black spots are glitter stickers again perfect for posting as they are flat. 

So with these 4 cards it takes my total this year to 100. Phew. Whilst I don't need that many it does mean I can now start stock piling for future years as friends and family always look forward to receiving a hand made card and I don't want to stop doing that. 

Just had out invites for our booster vaccines and used the web site links to book. Much easier and simpler than back at the beginning of the year. Won't be having the flu jab at the same time though as I think that will take me way over the top for having a reaction. 

 I also see that my followers have increased in numbers so thank you for arriving here. Hope you will stop by again. 

Take care and stay safe
Hugs 

Thursday, October 21, 2021

Vertical Windows.

Have you ever had a day where you start a card and it keeps going from bad to worse before you just about  manage to bring it back from the Brink?  Yep oh yep!! I  had one of those such days and with 70 odd photos (taken during the  course of the day for tutorial purposes) in my camera ready to upload the last thing I wanted to hear was my computer saying  "So, after hanging around all day waiting  You now want me to sit here and download 70 + photos onto my  hard drive, let you sift/sort through them all, clog up my waste basket with the disgards and then help you write 3 posts? Your having a laugh aren't you!!!!!"  Said computer promptly shut down and no amount of pretty pleasing  late last night had any effect so hence I am a day late posting the next Butterfly challenge which is
Thankfully my computer had a change of heart this morning, decided it did like my camera after all  and downloaded everything without a murmur. Don't you just love Hi Tech.

First Card is not how it was meant to look so I am calling this Version I.  Yes it does have a window and it is Vertical.  I did manage to salvage the die cut butterfly after a fashion and the card does look ok just certainly not what my brain had envisaged. 
I have used a Nellie Snellen Multi Frame to cut the window out. ( If I had  been planning on cutting a frame out I wouldn't have left such a small border all round  but I had to cut away the resulting error I had created in the centre) I have used a sheet of cream vellum backed with a sheet of double sided tape onto cream card stock for added strength. The die cut is again another vellum paper which I backed onto red card stock and then glued in place over the top.  The tutorial over on the butterfly blog has full pictures.  Nothing wrong with the die cut itself just the effect I was trying to achieve  didn't work. 
Finished off with a gold Sentiment sticker and gold dots. Diamond paper is I think by SU. 

Second Card  so back to the drawing board for this one which I am calling Version II. This card is also known as a Vertical Tri Fold and you can find various tutorials for it over on YouTube. This is my version of how I made. 
The butterfly die is by Memory box called 'Calais Butterflies' and the sentiment is by Woodware.  Punched butterflies are by SU.  Everything else used  from my stash. 


Believe it or not this is the same card but by using different coloured cardstock for the folds and just  folding in a different order you get two very distinct looks.  Full instructions are over on the butterfly blog under the card shapes tag as normal. 

The challenge is running for 3 weeks and then there will just be one more for the letter W which takes us nicely up to Christmas when the butterflies get cocooned for their winter snooze ready to reappear once more in the New Yr with a fresh alphabet and a different wheel to spin. 


Take care
Hugs 


Sunday, October 10, 2021

It's a Snow Life.

Time once more for the girls in the Chrstmas Card club to show our next theme's card which Kate chose.
Snowman/men/Snow families. I do have lots of digi stamps I could have used but these two stamps were in my christmas box just jumping at me to be used. 

1st card.
Uses a stamp by Woodware called 'Skating Snowmen'  and I have teamed him with a freebie paper from Crafts Beautiful by Alison Butler. I always colour my images up first and then go and hunt out a paper to match. So far it has worked out!! Coloured using my good old trusty Graph'it pens and a silver gel pen. The sentiment is by Studio Light. The strip of green card was lurking on my desk so I stuck it on for good measure.  Inside of card is also decorated with a strip of the design paper that was left over. 


2nd card.
Uses a stamp by Two Jays  called 'Cheery Snowman'. Again coloured with my graph'it pens and then searched for a pattern paper to go with it. This one is from Making Cards 2016 called Christmas florals. ( Oh, If we only knew then what Covid delights were in store for us).  I have matched up the holly berries on his hat! Sneaky or what. Strip of cardstock was hiding under the  green strip above so as I had clocked it and with no fresh place for it to hide it had to be used. The round the corner sentiment is by  Phil Martin from his Scribbles Christmas Corners Set.  The let it snow was from the same Studio Light set used in card above. 


Just been for a trip down to the hospital this morning as The Doc had to have a Covid Swab Test done prior to him going in on Wednesday for a  planned medical  procedure so we are now in lockdown. Had to get the food shopping delivered a day early so we can be totally isolated for the next few days.  

 Stay Safe

Hugs 


Thursday, September 30, 2021

In A Flap.

Time for another challenge over on the butterfly blog. We are up to the letter T now so 


Here is the butterfly wheel to be used. 

Twilight Lavender = Deep Lavender
Thistle = Light Lavender
Tea Rose = Light Pink
Here is my example for you. 
This is the tower standing upright and the front of the card. I have used two papers from  a  pack by The Paper Boutique called 'For Her' and then plain card stock in varying degrees of lavender. The sentiment is a silver sticker. The butterflies have been punched using two different size SU punches and the hearts from a Woodware punch. 
This is showing the back of the tube  and shows a panel for putting your additional wording on. 
It folds nice and flat for posting.  Photos are showing difference in colour hue as they were taken in daylight and at night time.  Looks complicated but it isn't. It really is just like paper piecing. 

The instructions/tutorial is over on the Butterfly Blog as per usual and can be found under the card shapes tab here.  I hope you will give it try out. If you do not fancy all the layering then one level can be left out. Challenge is running for three weeks and will end on 19th October. 


Hugs


Sunday, September 26, 2021

It's a Pink Thing!

The theme for this weeks show of cards from the Christmas Card Club Girls is to use Non - Traditional colours which was right up my street to use these pretty prints from a Paper pad set by The Paper Boutique 'A Whisper of Winter'. The main colours being pink, brown, cream and pale blue. I pulled out a selection of die cut sentiments and die cutting frames to use  along with Buff, Chocolate and Steel Blue cardstock and got started. I have managed to make 5 cards to swell my growing pile of Cards.  Again I had to wait until this morning in order to take the photos which were all done in the summer house  on the pink table and against the pine wood cladding.

First card.
Using a die cut frame by First Edition Crafts FEDIE012 and a sentiment die by Tonic 'Wave Merry Christmas' 

Second Card.
Uses the same die cut frame but this time I have kept the card I cut it from and dropped the die cut down to the bottom to give the interesting drop shadow effect. The sentiment is again by Tonic which I die cut in brown and steel blue and layered slightly off one another. I then added the two srtrips of gold edging to finish. 

Third Card.
This card is using a frame that was left from using another die cut which I haven't as yet used the inset for but I thought it made an interesting overlay to place a different design from the same set underneath it. The sentiment is a die cut by Creative Expressions CED3046.

Fourth Card.
This was actually the first card made but I didn't photograph them  in sequence. An easel card using a die frame by Crafts - Too 'Scalloped Edge'  PCD77 and a sentiment by Tonic.  The bow was an after thought as the scrap of ribbon (waste not want not)  was left over from making the last card below. 

Fifth Card.
My most favorite of them all with its abundant pink roses and using the burgundy ribbon which was out on my desk from being one of  the shoulder tabs on a jumper I had just bought (on line) and cut off. 
Sentiment was the remains of a  silver peel off after using the actual wording on a previous project. I really do use up everything in sight. I have die cut the same design paper out twice in different sizes using the Crafts - Too die set above and layered up very slightly off centre. 

I'm off to sit in the Summer house now with a coffee and attempt to catch up with your blogs.


Stay Safe
and if your in the right age range
wait for your Third Covid Vaccine 
Call up.
 
Until then 
Hugs

Sunday, September 12, 2021

Festive Greetings

Goodness me it's time for the girls to show our makes in the Christmas card Club. Rita chose the theme this time of Poinsettias. I love to see these on a christmas card and have several different stamps and digi images for them. Having said that though I couldn't resist buying the new Gemini christmas stamp and die sets. There are six in the collection and one just happens to be a poinsettia.  I used the Candle a few weeks back. I am still getting to grips with using the split dies and the jury is out on whether I like them or not. I have tried both ways now of first stamping and then fitting the split die round the stamped image (as I did on the candle card here) and today using just one side of the split die to first cut out the card base and then to stamp the image afterwards. I found this quite fiddly to be honest and as I have used my promarkers to colour with I  had to cut a further piece of card stock  to cover the bleed through on the inside of the card. The sentiment comes with the set which is called Festive Poinsettia. 
It needed the relief of the green cardstock to back the inside of the card with.

First picture showing the card front cut away using the split die. I do like the result it gave. 

Second picture showing the card closed flat 


I only managed the one card as it has been a full on week here with 3 September Birthday cards to send out all in the same week. Two for family and one for my lovely blogging friend Di. Happy Birthday once again for today. 

There is still a worrying number of deaths from covid being reported 
so we still need to keep on our toes.
Stay safe and well.
Hugs 

Thursday, September 09, 2021

Slide and Lock

The  Butterflies are back with a brand new challenge over on the Butterfly blog.

 The letter  this  time is S. 


Here is the butterfly wheel to be used. 


n.b.  Shimmering blush = Pale Pink

and your Stitiching can be Real or faux. 

Without further ado here are my inspiration cards for you as I am already running late, life keeps on getting in the way at the moment. 

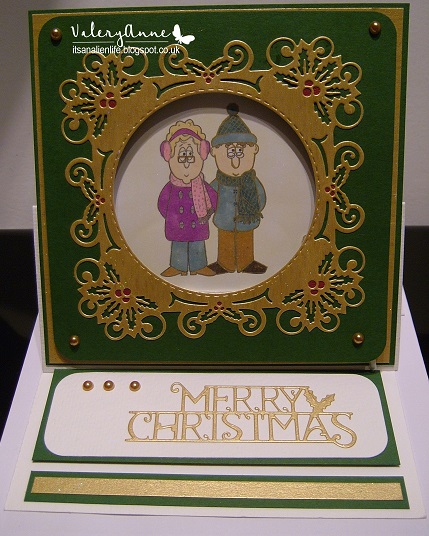
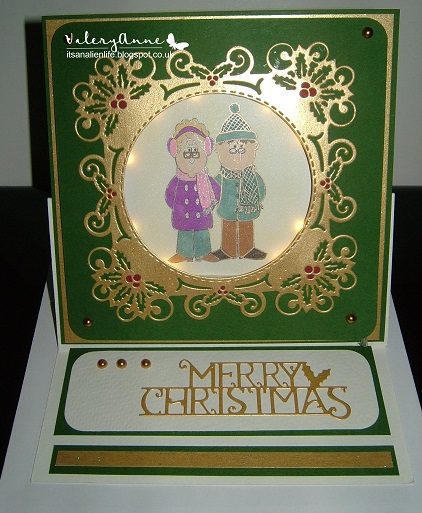
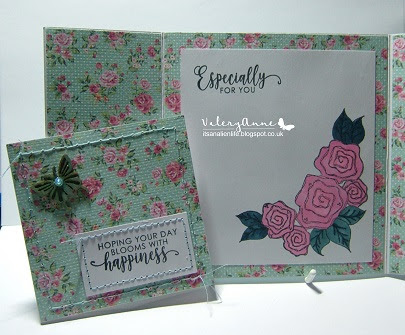
1st card using  Version I which is over on the Butterfly Blog  on the Card shapes tab which this link will take you straight  to.

I have used all six elements of the wheel and chosen real stitching which I created by hand using a double sewing thread.  The design papers are all by The Works and the sentiment is by Julie Hickey.
Below is the inside of the card opened up once the Slide and Lock mechanism has been removed. 
The stamped image is again by Julie Hickey along with the sentiment. Coloured using my Graph'it pens
to match with the roses on the design paper. 


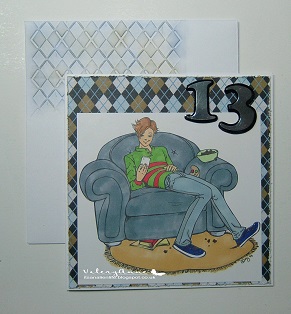
2nd  card using  Version II and again using all six elements of the wheel and real hand stitching. 
Design papers are all by The Works. Sentiment by Julie Hickey and the butterfly is by Memory Box 'Terrace" I have hand stitched round the butterflies edge and raised up with 3d pads (I use strips of cardstock oddments adhered together, usually 3 strips is enough which I have used here).


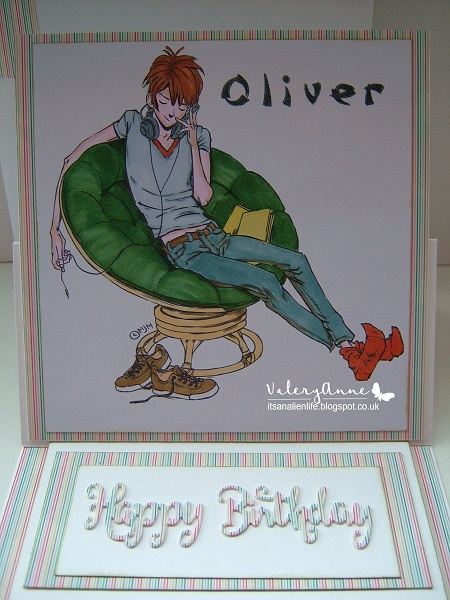
Inside of card where I have used more hand stitching and the pink butterflies were already punched out and in my oddments box waiting to be used. 

I hope I have given you some ideas and that you will come and play in this challenge. The  Butterflies have a brand new garden to play in which I will be posting up pictures for you to see shortly if I ever manage to get the planting finished that is as I keep changing my mind where the plants should go!
Decisions, Decisions!!

Hugs to you all
and continue to stay safe and well in this strange old world
we are now finding ourselves in.