
A new challenge has just started over on the Butterfly blog. The wheel has landed on a fresh letter.
Here is the new format wheel and there are two choices for you to play along with.

1. Make a card using at least 2 of the colours on the wheel + your butterfly of course.
or
2. Make a card using the Book binding Fold Shape + any 2 of the colours + the Theme + your butterfly of course.
There is a tutorial as normal over on the challenge blog which you will find on the Card Shapes tab that is under the banner at the top of the page.
If you play your cards right and use a ready made card blank then there isn't even a fold to make. If you use cardstock to make your card base then just one fold is needed. How easy is that!!
Here are my cards for inspiration.
Card 1. Tutorial I
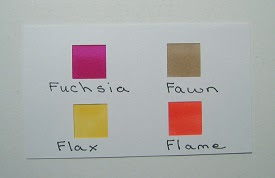
Uses from the wheel: Floating Strip Card/Flowers/Fuchsia/Fawn/Flax/Butterfly
I used up Flax (Yellow) strips from my odds box and then cut a few strips off of a sheet of paper from a paper pack by Violet Studio with the pretty butterfly design on it.


Card 1. Tutorial II
Uses from the wheel: Floating Strip Card/Flowers/Flame//Flax/Butterfly.
I very nearly gave up the ghost making this one as after taking the photo (of all the items needed) for the tutorial the pansy flower die simply disappeared.I spent a frantic 2 hours searching my desk, the floor, everything in my craft room that I had touched looking for it. I finally found it wedged down the side of my pencil tray that is a black box. The pansy die also being black didn't show up and I just caught the edge of the pansy flower peeking out over the rim. Relief and curses followed in quick succession with the amount of time wasted.
Anyway here is the card.

Strips of flax and flame cardstock mounted onto an acetate sheet which I precut with a circle die and then die cut the pansy die out afterwards. It did need several passes with my machine and then snipping out in a few places using my thin scissors. I recommend using very thin acetate or cutting from a self seal bag that you would normally use for putting your cards in. I then die cut the pansy in more cardstock and once the circle was adhered to the front of the card stuck it down onto the card front through the pansy aperture to make a recessed image. It does look very effective IRL.
Life has a way of throwing curved balls at you and I have been MIA due to The Doc having a minor procedure that turned out to be not so minor and 2.5 hours under the knife instead of the 30mins intended. So lots of trips up and down to the hospital for dressing to be changed and stitches taken out. Last visit was yesterday for the final all clear and me to be shown how to massage cream into the 3" scar he now has on his right shoulder. Now that the stitches are out and the plasters all off he is feeling a lot more comfortable with strict instructions to take it easy for the next six weeks.
I hope you will come along and join in the challenge which is running for 3 weeks so plenty of time to get out all those pesky strips.
Stay safe and well
❤❤❤
