Monday, September 29, 2014

Another Six for Rudolph.

Rudolph time again and once more
I have endeavoured to make six of the same.
Looking at my pile of  Christmas scraps 
I thought it was high time instead of just adding to them
that I  actually started to use some of them up.
So an idea of using up the scraps randomly across the page
was born.
The first card (purple ) took me ages as I was sticking
 the strips on individually to the card.
At  this rate I thought it would be Christmas Day
come and gone before I had them all done!
I then hit on the idea (rather belatedly) to attach
double sided tape all over the card front, peel off
and then just wiz across with the stripes of paper
leaving the edges overhanging.
It was an easy task to use the trimmer to cut them off afterwards.
It helped to have the pile of strips ready to hand
and sort of plan out the colour ways. (That's my story).
Here are the finished cards.
I used odds and ends of embellishments from my
Christmas box. Some had been in there Donkey's yrs.
The bell especially.
It was badly scratched but a covering of Versamark
and very fine gold SU glitter worked a treat.


And the insides slotted in 3 together

to save space and boring you all to bits!.

 So how did I do with my pile of scraps?
 
Well I can close the lid on the strips now!

but the next size up pile of scraps
has hardly had a dent made in it!
O'h well. Back to the drawing board.
Entering into the following challenges:
Sarn's Rudolph day. Make at least 2 cards.
Crafty Hazelnut's Patterned Paper. Anything goes with patterned paper.
Fab 'n'Funky #230 Christmas.
Crafting By Designs # Get Ready for Christmas.
Pixie's Crafty Workshop #144 Use up your snippets.


Friday, September 26, 2014

3 Little Ellie's

I mentioned a few posts back that I have an
Elephant Hawk Moth  slowly demolishing my Fushia Bush.
I looked him up on the Web and found this good likeness of him.
Kinda cute  don't you think.
 
I have been reading up on these little creatures and
found several sites which explain in detail how you can help to
Winter them over the cold season and then help them hatch out
in the spring to a beautiful Pink moth.
Now you know me and pink so to this end I now have one safely wrapped up
in the cocoon of  dry leaves  (web page suggested drying the leaves off first in your oven but I thought The Doc would draw the line at that
 so I zapped them with my heat gun instead.)
that I provided for him and he is now asleep in his little padded Tupper ware box
ready to be stored on  the top shelf in the garage.
 
I had just finished doing all this when blow me if another one didn't
suddenly appear and start noshing on my Fuchsia bush at which point
The Doc inquired if we were now running a Wild Life Sanctuary in the garden!!
This one is refusing to play ball though and is getting through the pile of fresh leaves
I'm giving him daily without so much as a yawn and refusing to go anywhere near
his pile of dried leaves.
 He then needs mucking out each day
(where is Hettie when I need her!!)
They do these little poos that look like miniature hand grenades.
I kid you not.
 
This morning I found another one of them marching down the Garden path
making straight for my Fuchsia bush.
He has now joined the second one but at the moment is turning up his
nose at his fresh pile of leaves.
I will keep you posted as events unfurl.
 
I'd like to say I'm feeling better from my trip to the Dr's
Monday ( but I had to have the Locum in order to get seen )
and this resulted in being given yet another type of antibiotic
to try out. Being told my wee would turn bright yellow this time
didn't bother me it can go sky blue pink just so long as I'm not crawling
up the walls at 50mph.
No its the other side effects
Itchy hands
red blotchy rashes on both arms
back pain
and so The Doc says
Hot in Bed.
 O'h Pleeze!! soap is in the dispenser go use it!
This has to be a better list than the side effects on one
of The Doc's medications which right at the the bottom said
Can cause Death in some patients!
Well that's ok then.
Catch 22. If the illness doesn't get you the cure does.
Needless to say he is popping the pills like smarties.
 
Have a great Weekend everyone.

Wednesday, September 24, 2014

Take one old picture frame.

I thought I would have a little experiment of making my own Crackle Paint
using Acrylic paint and PVA glue.
So I popped down the local charity shop and bought an old frame for 50p.
(last of the big spenders me!!)


I had  bought 2 frames the same and this is actually  the 2nd one 
 as I forgot to take a photo of the one  I used 
before I painted and added the embellishments.
 Oops!.
Anyways there are loads of videos on You tube showing the technique.
I first dismantled the picture. I have kept the one in there for later use.
I then painted the frame with a coat of yellow acrylic paint.
I used 'Jo Sonja' paints for this.
Once dry I gave a liberal coating of PVA glue  all over
and whilst  this was still wet coated with a further acrylic  paint.
This time I used dark brown as I wanted the yellow to show through.
The crackle amazingly starts to work almost straight away but I
left to dry over night and was pleased with the results.
This is a great saving so will be using this technique all the time in future.
No more expensive pots of crackle glaze  for me. 
Tip. I wanted my crackle to run the same way as the grain of the wood
so painted the PVA glue on the same way.
If you want a more bark like appearance and small crackle lines  then paint
the PVA on  first one way and then the other.
I stamped the picture using Chocolate Baroque's
'Harebell Butterfly' stamp set
using Distress Ink in Walnut Stain.
The flowers were coloured using Distress Marker Pens.
I wanted the scene to have an Autumn feel to it
so instead of using blue for the Harebells I went with
Tea Dye and pulled the colour out with picket fence
to make the flowers look like they were faded out.
The butterflies were coloured in using SU Stampin Pastels.
These have been in my stash for years and are a NBUS.
(Never Before Used Schtuff).
Background was given a very light brush over with pale blue pastel.
The sunflowers were made using
Cheery Lynn designs DL 121 Sunflower die.

I stamped another butterfly out from the set and fussy cut and popped him
on the top of the frame  as if he had just settled there.

This is to showcase my  Butterfly challenge #15
which is to use  Autumn colours on your butterfly.

Entering into the following challenges:


Darnell's challenge#2 Never before used schtuff
Cheery lynn Designs #15 Die cut flowers.
Lexi's Creations #125 Autumn colours.
Make My Monday #  Autumn fall colours.
Die Cuttin Divas #184 Fall is here.
The East Wind #15 Feel the fall.
Crafting For All Seasons #86 Colours of autumn.
Scrappers Delights #32 anything goes/ or no design paper.
Simply Create Too # Fall/autumn.
Pixie's Crafty Workshop #143 use up your scraps. (yellow/orange divider card pieces).
One Stitch At A Time #220 Anything goes with a flower.
Our creative corner # Autumnal image.
Seemacrafts # Autumn is coming.
The Mirror Crack'd #1 Anything (mixed media ) goes.

Sunday, September 21, 2014

Winter Wonderland.

Late posting as I have a nasty bout of Cystitis
and have only just climbed down off the walls
for sufficiently long enough to sit at my laptop.
 
It is time again for another challenge over
at the Christmas Card Club.
This time is was for Christine to set the Theme
which is Winter Wonderland.
My thoughts went straight to silver and blues
and I knew  which papers in my stash
I wanted to use. The snowflakes is actually scraps of
old magazines pages that have been painted over
and then the snowflakes stamped randomly on top.
Not by me though.
I won some stash several years ago
from a German blogger who was de stashing
and these sheets were amongst the goodies I received.
 
I used SU grey card to make the card base.
Then layered up with silver holographic paper
(from Hobby Craft years ago)
and my favourite Navy pearlised  cardstock.
I edged round each  of the blue snow flakes on the paper
with  a white Gelly Roll pen and then dusted over
with Glamour Dust whilst the pen was still wet.
The Reindeer  was a left over from
a Kanban topper sheet called  'Winter Reindeer.
I gave his Antlers/legs the same treatment with
the gelly roll pen and Glamour dust.
Finally I glued blue gems to the antlers
and white to the snowflakes and printed the sentiment
from word.

I tried taking a picture with the card flat so you can
see the lovely sparkle from the gems
much better IRL.
 
I then had the  bright  idea of making another card as I thought
the snowflake paper looked good as a stand alone. 
This card took 3 times as long to make as it kept going wrong.
It did start out the same size as the first one! Enough said!!
 
Note to self. Quit when one is ahead!!
I woke up this morning and found I had missed
2 gems off the card and the Doc said I had
sparkly bits all over my nose.

Again I tried taking lying down (the card not me)
though I did feel the need to do so in a dark room afterwards
IRL it really does sparkle .
So does my nose!!!!
As I have used up loads of snippets popping over to Pixie's Crafty Workshop. #143.
 
P.s Hazel kindly invited me to also link up with her challenge so that's where I am off to now.
Crafty Hazelnuts Extra # Anything Christmas.


Wednesday, September 17, 2014

Insects and Daisies

It is week 2 of my Butterfly challenge.
I have made the following card to showcase.


I only had a small piece of the design paper
which was a freebie in a magazine so wanted to use it economically.
I tried using the triple stamping technique but using the paper instead.
It sort of worked!!
I made the butterflies from scraps of shrink plastic
which I then coloured with Promarkers and Glossy accents.
I love making and using these as embellishments.
The daisies are made from a Crealies die
'Creative Flowers' CL CF 25
to mimic the daisies on the paper.
 
Here is a close up .
Sorry it is a bit blurred but camera is playing up.
I popped everything onto 3D pads to give the card dimension.
I'm off out into the garden now.
We have some outbuildings we are taking down
and there is an 'Elephant Hawk Moth' caterpillar
I'm keeping my eye on as he is slowly demolishing
my Fushia Bush!!
 
Entering into the following challenges:
Crafting From The Heart #36 Anything goes.
Crafty Boots # anything goes.
My Craft Creations # Anything goes.
Scrap Creations # Favourite Embellishment.
Scrappers Delights #31 Anything goes/make your own flowers.
613 Avenue Create #89 Anything goes.
Dream Valley #90 No stamps/digi's allowed.
Scribble & Scrap #27 Anything goes.
Pixie's Crafty Workshop #142 Use up your snippets. (shrink plastic for butterflies)
Virgina's View #7 Patterned paper/designer  paper.


Saturday, September 13, 2014

Told You!

I told you I was smitten with Stampbord!
 
Here is another piece made into a card this time for my Dad.
He will be 90yrs old next month.
I used navy pearlized card and SU card stock
along with silver mirror board to make up the layers on the card.

The Stampbord is a piece  1.25"x 2.5"
I decided to create a small scene this time
and started by using D.I's in 3 different shades of blue
to build up the background which in this case was a pond.
I then used a small 'Loon Duck 'stamp along with  'Reeds ' and 'Pebbles'
from a set of stamps by Craft A Scene.
I stamped using Memento Tuxedo Black ink.
Once dry (a few minutes) I started to etch back
into the stampbord to give the highlights on the water,
pebbles and reeds.

I coloured the edges of the board with black ink
and mounted onto the card.
Sentiment is by Britannia. Die cut in the two colours.
Matted slightly over lapping  to give the shadow  effect.
I have since bought some ATC  and Coaster size bords.
Oh yes I'm truly smitten!!
 
Entering into the following challenges:
4 Krafty Girlz #26 Anything goes.
Stamping Sensations # Things with wings.
Crafts Galore #9 Make a card.
Sister Act #74 Anything goes.
Suzy Bee's Bloomin Challenge  #46 Anything goes.
 

Wednesday, September 10, 2014

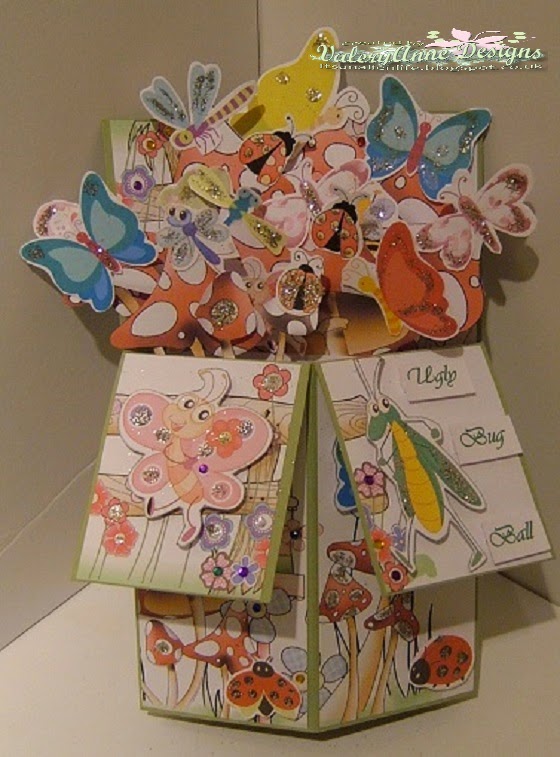
3D Pop-up Box card.

The new theme over at my Butterfly Challenge  is
'Ugly Bug Ball'
and is a tribute to my Mum.
It is also my sister's birthday today.
Happy Birthday Sis.
I have already shown the card I made and sent to her.
 
I decided to make a 3D Pop-up box card
so that I could incorporate as many images
as possible onto the card to inspire you
for the challenge.
 
I used a sheet of  green SU card to make the base
and followed excellent instructions on Janine Quinn's blog
 
I used  images from Polka Doodles Bonbon Belles digital CD rom
to create the background on all the flaps and sides of the box
I printed out several of the toadstool images and fussy cut them
to make the different  height layers
for the insects to sit on inside  the box.
Insects are digital clip art from Digi Stock Design

 Entering into the  following challenges:
Crafting From The Heart  #35Anything goes.
My Craft Creations #Anything goes.
Through The Craft Room Door # Anything goes.
Divas By Design # Anything goes.
The Crafty Bloggers Network # Anything goes.
Suzy Bee's Bloomin challenge #45 Anything goes.
City Crafter #228 Butterflies.
Crafting At The Weekend #5 Anything goes.


Sunday, September 07, 2014

Something beginning with 'S'

It's time again for another card make
at the Christmas Card Club.
Hazel has challenged us to
Use something beginning with 'S'
Believe it or not the only thing I could think of was
'S' for silver so that  was my Starting (pun intended) point.
I pulled out a silver card blank  and then the rest just followed.
1. Silver card
2. Snowman
3. Silver glitter
4.  Silver Sequins
5. Sentiment
then when I really looked at the card I had made
I also found
6. Scarf
7. Two sequin stars
8. Snowflakes
and finally
9. Shaped edges


Still trying to use up my oddments of Kanban Toppers.
I found this snowman and matching sentiment.
Looking through  my freebie papers I found this one

10. Sea green colour by Alison Butler
(think I might be pushing the boat out on that one though!)

which matched the topper perfectly.
All the rest came from my stash.
I also had a small topper  to make a matching tag.


Entering into the following challenges:
Pixie's Crafty Workshop #141 Use up your snippets. (lots used here).


Wednesday, September 03, 2014

Butterfly Pendant.

I saw on Sally's blog the other day
a Pendant she had made using Stampbord.
I had never heard of this and enquired from Sally what it was.
Sally explained and kindly offered to send a couple of pieces
for  me to have a play with (aren't blogging Pals the best!!)
In between time I had a look on  the World Wide Web.
I found loads of videos and once I'd seen the product in use
I was smitten!!!!
Here is my first pendant using one of the pieces Sally sent me.
Sally also enclosed a bail and chord for me. Yay!!
 
It comes in various sizes and in it's raw state
looks like this.
It is made with a clay-coated smooth absorbent surface
which allows you to stamp just about anything onto it.
 
I used D.I.'s in 3 different shades of blue to create the background.
I then stamped the butterfly from fFutters 2 set  by Inkylicious
on top with Memento  Tuxedo black.
I waited for  this to dry (a matter of minutes)
and then inked up with SU  Wisteria Wonder.
Once this had dried I etched and scratched the pattern on the stamp
back into the surface.
I used Coral Calypso and then Crushed  Curry  to build up the colour
scratching back to the previous  layer each time.
 

Finally I went over the edges of the stampboard with a gold metallic pen
and sealed the surface using Spray and Shine Gloss varnish.
 
It's the second week of my Butterfly challenge .
The theme is  Use a Butterfly with a Sentiment.
Love to see you there.
 
Entering into the following challenges.
The Cheerful Stamp Pad #94 Anything goes.
Love To Scrap #37  Lets fly away.
Crafting From The Heart #34 Anything goes.
Fan - Tastic Tuesday #51 Anything goes.
Live and Love Crafts #27 Things with wings.
Natalie And Amy's Challenge #24 Things with wings.
Rhedd's Creative Spirit # Anything goes.


Monday, September 01, 2014

Poppy Cube.

It is time again for the midway reminder for the
 
The theme as usual is Anything goes.......but not cards.
 
We have a new sponsor this challenge
Woodware.

 
The DT. were given a selection of samples
to play with .
I had six cardboard slide shapes and some ribbon
amongst my goodies.
I immediately thought Cube (as you do)!
 
I painted all 6 squares with a tester pot paint in 'Dusted Fondant'.
It is a lovely delicate pale pink shade.
I used the Inkylicious  'Watercolour Poppies'
clear polymer stamps set to ink a poppy
on all four sides and one larger poppy  on the top .
I created the grass effect using Stampscapes 'Reeds 067B
over stamping several time to give a dense cluster.
Both the poppies and reeds were stamped in DI 'Walnut Stain'.
I coloured the poppies with DI 'Tattered Rose'
by  first stamping the pad onto my craft mat
and then  picking up the ink with a fine paint brush.
I looped the ribbon through the slits on four of the squares
and attached together to form a box.
The last two were then threaded through top to bottom to form
the cube.

 
Entering into the following challenges:
Oldie But A Goodie # Anything but a card. (stash more than 6mths = reed stamp, inks)
Creative Inspirations #278 Flower  power
Brown Sugar #109 Anything goes
Hiding In My Craft Room #163 Freestyle
Anything But a Card # Use the number 5 (stamped out five poppies , 4 round sides 1 on top)
Dream Valley #89 Flowers
Scribble and Scrap #26 Anything goes
Frosted Designs # Break out the stamps