Wednesday, June 28, 2017

Replacement Door Hanger.

It is a new challenge over on The Butterfly blog.

I decided that my craft room door hanger could do with a face lift so I raided my stash for some bits and bobs and came up with this result.

The rose design backing paper is from Simply Homemade magazine from their Signature Collection which came as a freebie a few years ago now.  The filigree butterfly die I bought a long time ago from EBay but it came second hand and unpackaged so I don't know the make. Lace, ribbon, cork heart and the key all came from The Works and in my stash. The Crafter At Play sign was cut down from the original plaque sign below using SU 's Extra Large Modern Labels punch.

Appendage.
I took a punt on the butterfly being a Cheery Lynn Designs due to the colour of the die and sure enough  after looking on their site it is. From a 9 piece die set B266 (though it was being sold on EBay on its own. Can only think that the previous owner didn't like butterflies as the rest of the set is made up of insects). I do like a mystery solved!


Here is the back of the hanger showing the rest of the cut down wording that I punched out using SU's  Decorative label punch. The circle of butterflies around the hole uses a punch by Tonic Studios.


I hope you will come and join in the fun . The challenge runs for 2 weeks.


Sunday, June 25, 2017

White Christmas.

Time is flying by and another challenge is due from the girls in the Christmas Card Club. Lorraine set the theme for this one and asked for a White Christmas. A quick look through my used christmas card stack turned up these two card fronts.

The first one I trimmed down and adhered to silver glitter card to make a small border and then attached to a scalloped edge blank card base with 3D pads for a raised effect. The sentiment is a die cut by Xcut which I cut from a scrap of the glitter card that I had left over. The snow flake is part of the die cut.


Second card uses a stamp  Sentiment Corner by Phill Martin. Base card is made from 300gsm white cardstock and the corner rounded using my large Xcut chomper. Card front was trimmed down slightly and again the corners were chomped. Silver star stickers were in my stash.


Nice and simple but also classic looking.

Entering this card into the following challenges.
Scraps of Life By Scrappy Mo # Rudolph  Day June.


Friday, June 23, 2017

Bingo Lines

Here are two more cards using different lines of the Butterfly Bingo Challenge which ends next Tuesday so there is still plenty of time to enter.
I have been away for a few days  leaving The Doc at home alone with his new toys ie. New Washing Machine, New Iron and New hairdryer.  The old adage of everything breaks in three's certainly rang true to form here .Hopefully thats the end of it and the expense!

So my first card uses the the line  Banners/Butterfly/ Brads along with the colour Heather. The design papers are all by Nitwits from their digital Lavender collection.  Butterfly is die cut using Cheery Lynn Designs DL 113AB. Purple cardstock (for the base), embroidery thread and brads from my stash.


Second card uses the line  Beads/Butterfly/ Borders with the colour Heather. The design papers are again all from Nitwits digital Lavender collection. The bead pin bow and butterfly sticker are from my stash along with the scalloped edge card base.


Thursday, June 15, 2017

Just to tell You

Just a quick post to give you the heads up that Faye(Fluff) is back on the old goggle box tomorrow.
Hochanda channel at 11am showing off her incredible colouring skills using a new medium.
Hope you can set your recorders up or watch live.  I will be cos I know what is coming up.
Prepare to be amazed!!

All  a bit nuts here at home. We got the internet back up and running  and then put a load in the washing machine only for it to decide to bite the dust.  Repair man came out yesterday but the cost of installing a new control board into it plus the configuring said board + call out charge would have been more than a new machine so long and short of it is a new one is on its way and being installed on Monday. The old one was 12yrs old so it had done it's working life .

So what's a girl to do? If ? If I can't wash then I I can't iron. I know ?I will craft instead!!!
Simples.


Wednesday, June 14, 2017

Lets play Bingo.

Time again for a new challenge on the butterfly blog.

#80 Butterflies + B is for Bingo lines  and/or the colour Heather.

This is the Bingo board.


Here is my inspiration for you. First card uses the line Buttons/Butterflies/Bows

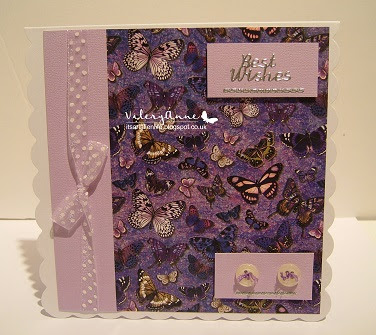
Card base is a blank scalloped edge which I have adhered a Hunkydory Image from their 'Little Book
of Jewelled Butterflies'.  I needed to trim it down just slightly in order to fit the card base. Coloured card is a heather colour from my stash along with the polka dot ribbon , pearl buttons and the silver sentiment sticker.

Second one is an easel shaped card and uses the line  Bling/Butterflies/Blooms.


Image is by LOTV from their Art Pad set 24 English Charm. Butterfly stickers are Dimensions by Anita's. Lace  was left over  from a previous card and the gems, sentiment sticker from my stash.

Here is a close up of the bling. After attaching the lace to the card I glued each gem on individually to make the pattern.
Hope I have given you some  ideas. This challenge is back to the normal 2 weeks so will close on Tuesday 27th June.

Entering into the following challenges:
Pixie's Crafty Workshop #285/286      Use up your snippets( left over lace)


Sunday, June 11, 2017

Christmas Scenes

Time yet again for the girls in the Christmas Card club to show our next batch of cards. Sylvie set the theme and asked for Anything Goes Christmas.  Simples!!!
A quick rootle around in my used christmas card box and found these two card fronts. Not much required doing to theme other than trimming down and adding to base cards made from coloured cardstock. The printed sentiments were in my stash and I simply mounted onto  oddments of the same card stock. The card fronts are raised up on 3D pads to give a bit of dimension but it doesn't show in the photos.


Sometimes quick and easy is the best especially if your short on time.

Friday, June 09, 2017

Butterfly Canvas

The first of two canvases that I made with BJ Crafts using Imagination Craft supplies on the very last day of  the 3 day Oyster Craft Retreat.  A messy but enjoyable time.  We covered our canvases in Rusty Patina Texture paint  and used several stencils to get the different designs. Heat drying after each application. Once we had finished the layering we rubbed on Alchemy Wax in turquoise and blue and then chose some laser cut velvet board images that we covered in Starlights metallic paints  which we again heat set and this gave the bubble effect .


Wednesday, June 07, 2017

In Ever Decreasing Circles

Just Time to show one last card  for the Butterfly Challenge.

#79 Butterflies + L is for Lots  of Layers and/or the colour Cream.

Challenge runs until 13th June.

This is my inspiration for you. I saw Jennifer Mcguire make a card using Stacked Die Cutting on her blog last month  and you can follow the video here. I thought it fitted my lots of layers perfectly.

I have used my Sizzix Scallop circles as my die shape.  Cut from 4 different coloured pieces of cardstock picking the colours from the image which is by Hunkdory from their 'Little Book of Butterflies.'  I cut the image down to fit behind the last circle. The sentiment is cut in 3 of the colours using a die from Crafter's Companion and glued together very slightly off each other to give the shadow effect. I have adhered the front to a piece of dark brown cardstock to make the base card.  The extra butterfly was in my stash 


Sunday, June 04, 2017

Painted Bag

This was one of  the last days projects on the 3 day Oyster Retreat that I went on. The workshop was run by BJ Crafts using Imagination crafts products. Time to get down and really get messy and have some fun. The first thing we made was this decorated bag using rice paper that we decoupaged.
This is what was left from the rice paper once I had selected and torn off the pieces I wanted from the design. It is quite easy to tear if you first soak a paint  brush in water and draw around the area you want to use.

We placed our finished layout onto the bag and lightly drew around the edges with a pencil and then removed the papers. The rest of the bag we painted using Starlights Metalic textile paint (making sure we did not paint inside the guide lines) and left to dry which didn't take long. We then glued our rice paper in place using fabric decoupage  glue and made sure that we covered over the top too in order to seal. The bag has a  lovely waxy feel to it on the decoupaged roses which are also very slightly wrinkled in appearance. Not sure if they are meant to be like that but I like the effect!!


Friday, June 02, 2017

Elegant Note Card

This was the second project that I made with Martine on the workshop at the Oysters Retreat that I recently went on.  We used Spellbinders diamond flourish pocket die to create our pocket for the front of the card. Die cut in white and silver (with the silver placed underneath and slightly offset to give thee shadow effect. We could choose the sentiment that we wanted and decorate the front with silver gems in our own design.

 Here is my finished card and below with the tag pulled out.
Quick and easy to make but very elegant looking and sparkles in the light.