Saturday, September 14, 2013

Snow Buddy

Here is the 1st card this month for the challenge over at Lady Anne's using the digi images provided by QKR Stampede. I have also used the  current sketch layout provided by Christmas Challenges ( with sketches)

 
I have coloured the digi in using Promarkers and  pearlescent chalks. The hat trim and tassel have been coated in white embossing powder(left unheated which gives a slight rough texture) but unfortunately  the photo is making it look grey. The backing paper is a leftover piece which has Christmas trees on it and then panels of red glitter sheeting on top.
The tartan ribbon is a snippet from my trims and the pre shaped sentiment base and sentiment from my stash along with the pearls.


You probably don't want to know this but there are only 102 days left  till Christmas!!
 
Entering into the following challenges:
Lady Anne's Progressive challenge #8: Use digi provided by QKR Stampede).
Christmas Challenges #90: Use sketch provided.
Crafty Hazelnuts Extra #9: Anything goes Christmas themed.
Winter Wonderland: Frosty the Snowman.
One Crazy Stamper: Christmas challenge.
Ladybug Crafts Ink: Winter Wonderland.
Cutie Pie Challenges #53: Christmas in September.
Pixie's Crafty Workshop #89: Use up your snippets (backing paper and ribbon)
Crafty Card Makers #99: Christmas snow and ice.


Thursday, September 12, 2013

Pink Freesias

Another Birthday card. Two in one week!! This is for Di of Pixie's Playground fame. I had just bought the Triple CD collection of House Mouse  Designs by Joanna Sheen. Primarily for colouring in the digis but when I saw this on the cd knew I just had to print it off and use straight away for this card. Not only is  Di into the House Mice same as me but she loves Freesias too. They are one of my  favourite flowers. I love their delicate scent. In fact I had them in my Wedding Bouquet!
I love using these two colours together.
Pink and turquoise card stock from stash.
Pre coloured digi from CD, details above
Backing design paper also from CD.
Sentiment made using Britannia word dies.
Pearls and ribbon from stash.

I'm always commenting on other blogs how nice it is to see the inside decorated
so this is just to show I can do it too  and I so  love this design paper.
Die is by Spellbinders 'Majestic Elements'.
 
Entering into the following challenges:
613 Avenue Create #36: Anything goes.
The Crazy Challenge #153: (Bingo line ribbon, image, flowers)
Tuesday Throwdown#164: Anything goes.
Country View Crafts #7: Layers.
Creative Moments #26 Birthday/anything goes.
As You Like It Challenges #10: Favourite flowers or trees. (Explained above).
Make It Monday #157: Paper Crafts.


Z is for Zip

The letter to be used this time over at the Craft Barn Alpha challenge is to use the letter Z.
Only one page in the dictionary for this letter so I knew exactly straight off which word I would choose, Zip. A quick rummage in my dressmaking box and I found a suitable length zip to use on the page.
Blue poster paint diluted down with white for the wash.
Sizzix Letter strip 656133 for the wording
Sewing thread, ribbon and zip from stash.
 
Entering into the following:
The Craft Barn:  Alpha challenge letter Z.


Tuesday, September 10, 2013

Knit and Natter.

Happy Birthday to my big Sis. When I saw this stamp on Jules blog a few months back  I just knew I had to have it too. A quick request for info and I found it is by Penny Black. A trawl round the web and I saw that 'Ideal World' had it in stock  so ordered it straight away.
 
Sis is a prolific knitter. No sooner is one item finished then another is started. In fact she belongs to a knit and natter group which meets up every week in her local craft shop so you can see why I needed to have this stamp!!
The old adage of never work with children or animals is very true. There is also another. Never work with acetate, not unless you have kid gloves on that is.  Having cut the aperture
I felt the front needed a bit of strengthening so the acetate came in useful for that reason.  The stamp has been coloured in using Promarkers and was placed on the inside of the card. The sentiment is a Britannia word die and the aperture an oval Xcut nesting die. Green card stock, brads and acetate from my stash.


Entering into the following:
Pixie's Crafty Workshop #89: Use up your snippets(left over Acetate from Tutorial).
Emmas Cards UK #20: Birds.
Creative  Card Crew #45: Things with wings.
Make It Monday #157: Paper Crafts.
Lacy Sunshine #16: Dies and or punches.
Brown Sugar #58: Animals ( or have I fallen fowl of the rules!!!)
4 Crafty Girlz Challenges #1: Anything goes.
Sister Act #23: Anything goes.
Catch The Bug: Anything goes
Totally Gorjuss #200: Anything goes.
Use Your Stuff #101: Birthdays.
.


Monday, September 09, 2013

Off to School.

Sweet Cheeks started School last week. How did that happen? Where'd the last 5 yrs go!! Little Miss Mischief starts nursery this week and her big brother moved into his 2nd yr of school. The times are a changing.

Back in the summer I had a request from Fluff. Could I please make Sweet Cheeks a bag for his P.E. kit for his new school? Not any old bag mind .It had to be bright blue(school colour) with a red car on the front just like Granddads!! How could I refuse such a request.


So I took a photo of The Doc's car drew up a template and cut out in red felt. Twice! One for the front of the bag and one on the back so that when it was on the peg at school he would be able to pick his out  whichever way it was hanging.

Sweet cheeks liked his bag so much it has been hanging on the back of his bedroom door  for the past 6 weeks!!


Entering into the following:
2 Sister's Challenge #160: Back  to school.
Cas-ual Fridays #114: Back to school.
Crafty Creations  #238: Back to school.
Crafting By Designs: Anything goes back to school.


Friday, September 06, 2013

Box with Drawers Tutorial.

Here is the  tutorial I promised for making a box with drawers. After the one I made below I had a 'What if moment' and wondered if it would work with 2 larger drawers. So stayed tuned for a 2 drawer version.!!!!
I will stay with the 6" square overall size. First you will need 2 pieces of  plain card stock (320 gsm)  6"x6" and 4 pieces of matching Design Paper. You will need 5 pieces  in all so make sure you have enough before you begin. I have used  a yellow rose design by Teresa Collins Designs 2013 called "Fabrications" which came in a pad of 6 different designs 30 sheets in total so just enough for me to use here.  Run a marker pen in a matching colour around the edge of the plain card( unless you are already using coloured stock as this gives a nice neat edge) on both sides and adhere (I have used double sided tape throughout) to the design papers. These form the top and bottom of your box.
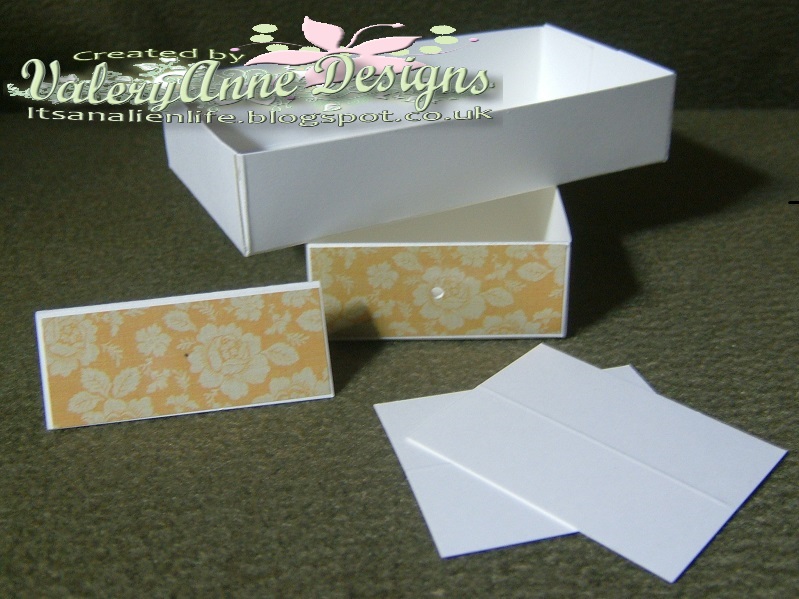
Next make the drawers. Using the same 320 gsm cardstock cut 2 pieces to the sizes shown below.
Over all size  of 7”  x 4 ½”. Score at 1" on all 4 edges and cut a small wedge from each tab which helps them to sit flat inside the drawer. Make up the 2 drawers.

The drawer fronts need to be reinforced as they will be taking a fair amount of stress when they are in use. As there are only 2 drawers they can be made to pull out from both ends so cut 4 pieces of 320 gsm cardstock  2½” x 2”  and score at 1" down the length. Fold and  from remaining sheet of design paper cut 4   1" strips of paper and use to  neaten one edge. Mark centre at this point for the drawer pull and then stick to front and back of drawer. Punch holes on marks and insert a brad to match paper design.

Using cardstock 220 gsm  to match paper cut 2 pieces  5” x 7 ¼” and score at the following measurements. These are the casings for the drawers.
 
Use the remaining design paper to join the two short sides together to form a square tube. (This is less bulky than adding an extra flap to fold over and stick down and has the added advantage of covering the sides of the drawers which will be on show).
Attach the casings together making sure that the design paper edges are to the outside. It is easier to do this with the drawers left inside as they will be more rigid.  Now attach to the bottom section.


Decorate your top piece before you attach. I have used another Bugaboo digi image and again put a sheet of acetate on top for protection. Image has been coloured with Promarkers.
The finished box with some handmade roses on top. Coloured with Promarkers to match the image.


And finally I managed to take a photo showing the reflection of the roses in the Acetate!

 
Hope you have enjoyed the tutorial.
Hugs Mrs A.


Monday, September 02, 2013

Craft My Life.

I am pleased to announce that I have been asked to join the Design Team (B) for the Bi-monthly Craft challenge Craft My Life. The sponsors for the current challenge are:


The theme is anything goes..... but  no cards and the  challenge still has 1 month to run so there is plenty of time to enter and we would be delighted to see you over there. Come join in the fun.
 
The DT's were given some lovely images by Bugaboo to play with and I chose this delightful
Rose and Butterfly digi to make my project with. I have chosen to make a 4 drawer box
and decorated the top using the image and then made some tiny roses to match. There is also an acetate sheet on top to protect it and just the very time I wanted the photo to show a reflection I managed to take a completely flat image not once but twice!!! Isn't it always the way!!


As there are rather a lot of photos showing how I made it and this post is already quite long I will do a tutorial on the making of the box separately.
 
Entering  into the following challenges:
Artistic Inspirations #57: Buttons or anything goes.
Lexi's Creations #98: Anything but a card.
Make it Monday #156: Any paper crafts.
Paper Crafting Journey: Anything goes.
Hiding in my Craft Room #113: Free Style
Pixie's Crafty Workshop #88: Use up your snippets.
Challenges 4 Everybody #28: Anything goes.
Digi's Galore: Anything goes. Must use a digi no real stamps allowed.